Being quite the wood stove enthusiast, I’ve come to understand how vital a chimney damper is for a wood-burning stove’s efficient performance. I saw many people installing chimney dampers and wondered why. So, I did some reading and found out that chimney dampers regulate airflow, boost energy efficiency, and maintain the longevity of the stove and chimney system.
So, I installed one myself, and it was absolutely worth it. Check out some of my experiences below, as well as some tips!
Understanding Chimney Dampers

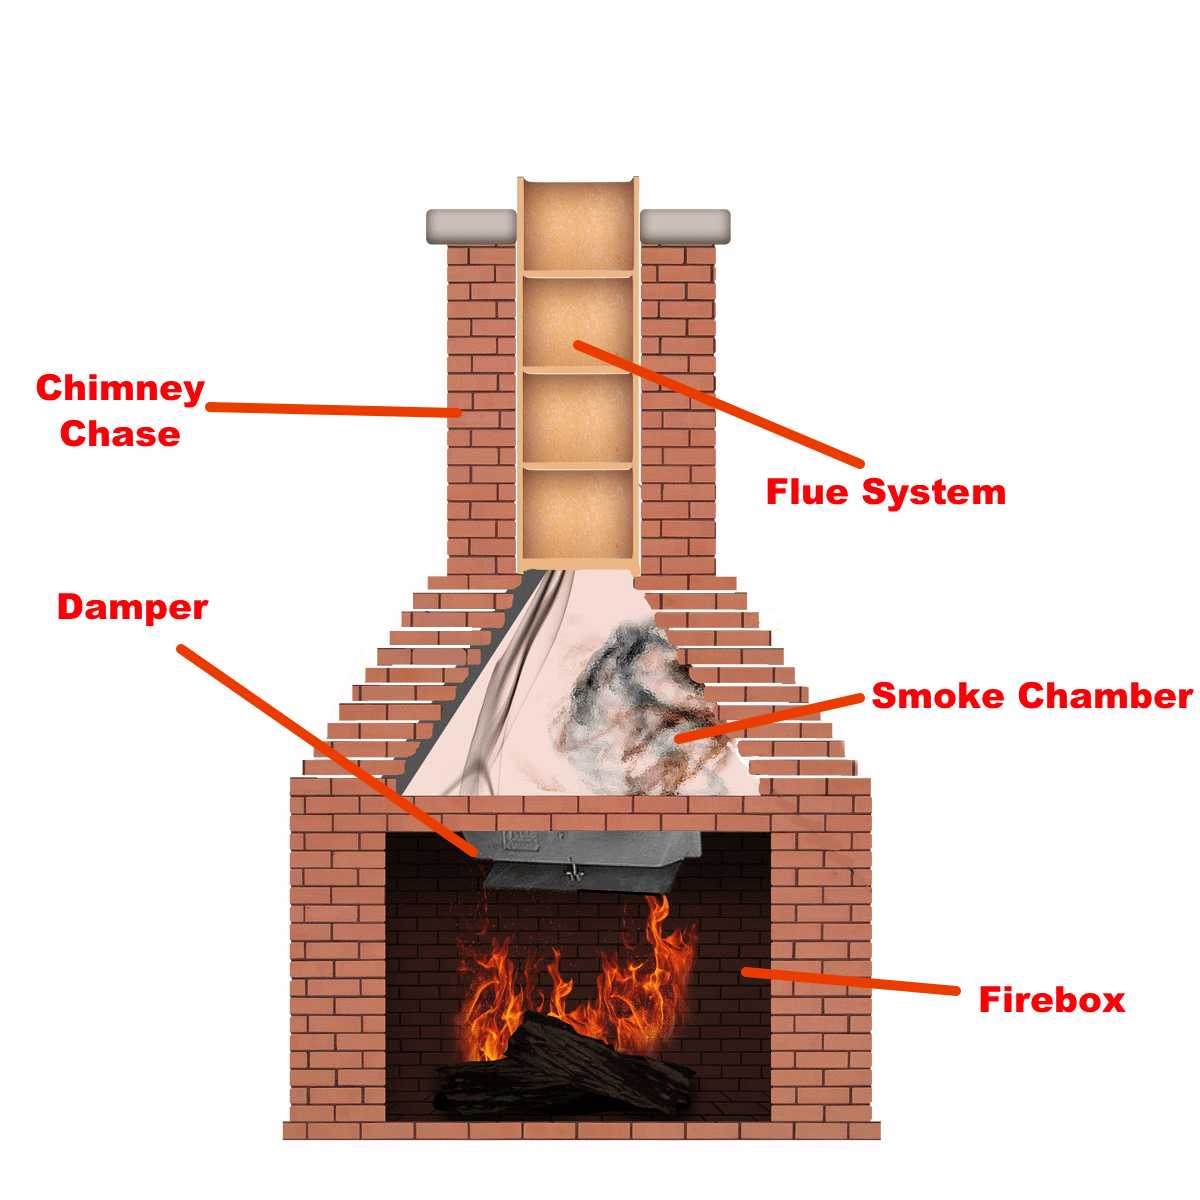
A chimney damper serves as an access gate that allows you to control airflow in and out of your chimney. This management leads to more efficient wood burning while keeping heat from escaping when not in use. Dampers generally come in two types:
Throat dampers
These dampers are placed just above the firebox at the base of the chimney. Since this has been done for much longer, throat dampers are more often found in older homes than top-sealing dampers like mine.
Here are a few advantages associated with throat dampers:
- Easy Access for Maintenance: Its location right above the firebox makes it easy to reach for maintenance work like cleaning or regular check-ups.
- Immediate Draft Control: Being close to the firebox offers immediate control over draft intensity, thus allowing for quick adjustments whenever needed. This aspect has particularly benefited my Cubic Mini Wood Stove (CB-1008 model). The key is adjusting the burn rate!
Top-sealing dampers
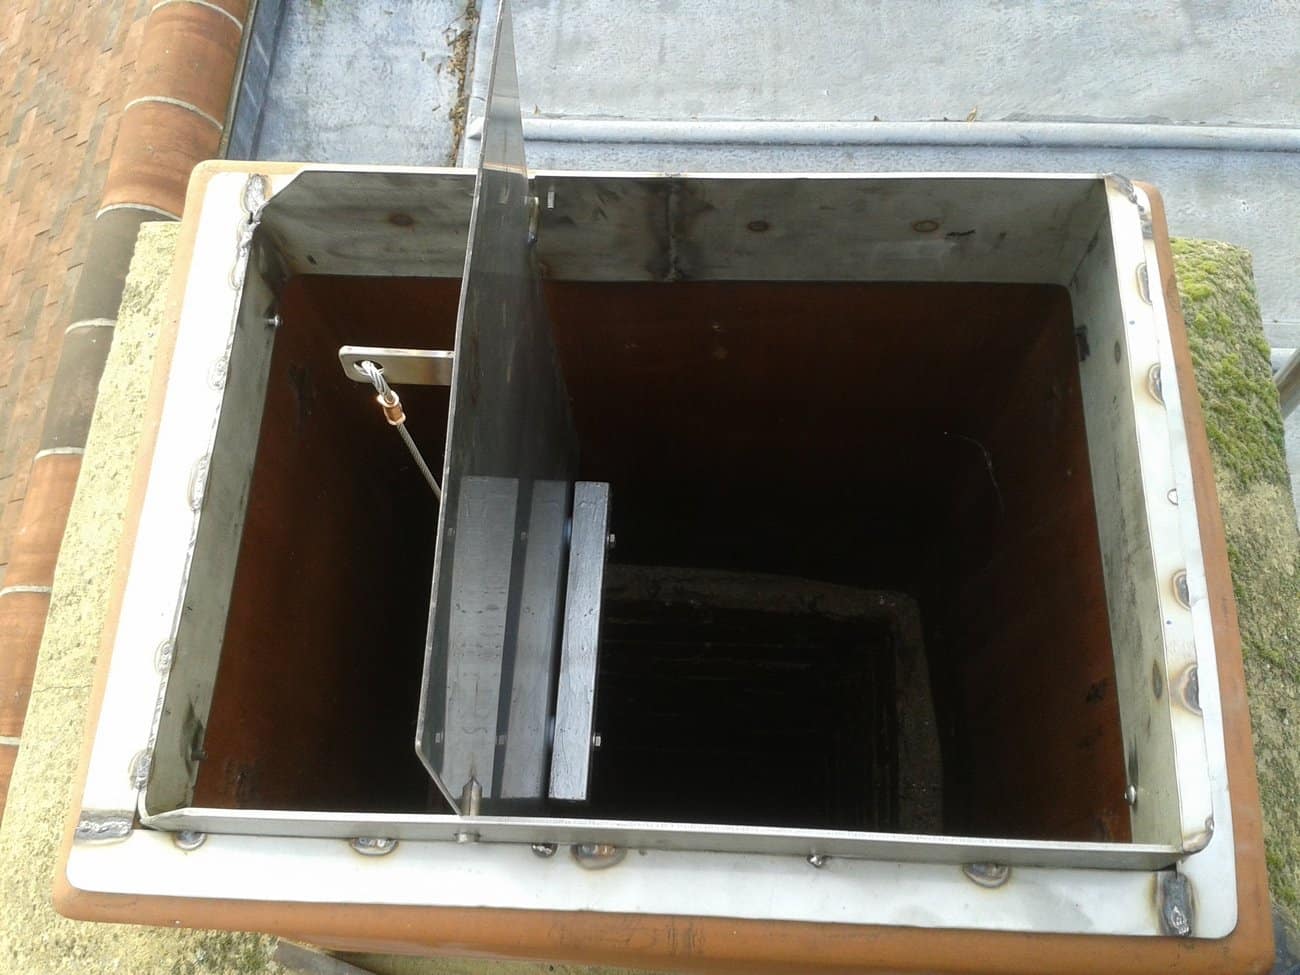
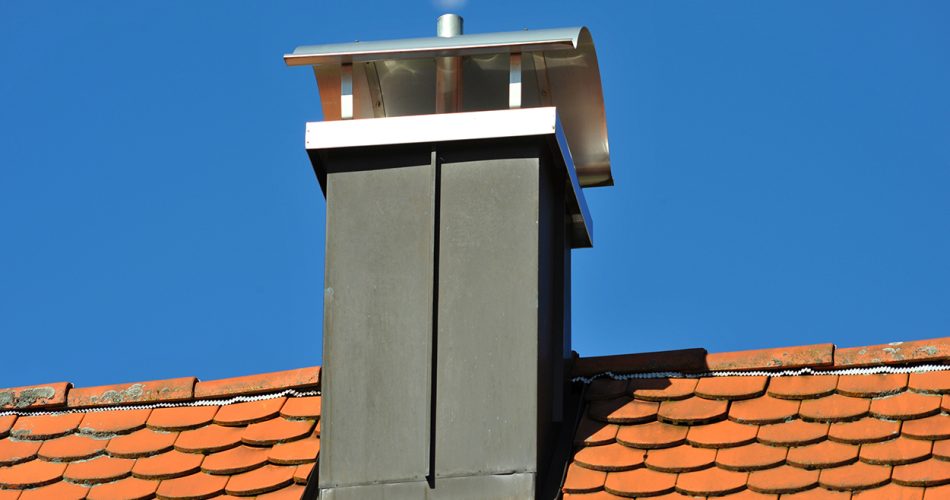
These ones are installed at the flue’s crown—they sit right on top of it! The height made their installation slightly more difficult because we had to ensure they were sealed properly so no leaks could get through.
Here’s what makes them stand out:
- Energy Efficiency: When closed, this damper provides an airtight seal, thus significantly reducing heat loss and improving a wood stove’s energy efficiency. After installing one, I noticed my heating bill was reduced during winter.
- Blocks Downdrafts and Debris: It sits at the chimney’s top, effectively blocking downdrafts and preventing debris, animals, or precipitation from entering the chimney. What a lifesaver during windy days and the off-season!
- Durability: Built with stainless steel or similar materials, they’re rust—and corrosion-resistant! If both are properly maintained, they’ll last way longer than throat dampers. For me, this was a major selling point.
Personal Experience
In my experience, both dampers have their place depending on your home’s specific needs and what you hope to achieve with the wood-burning stove. Yes, direct control over draft intensity is handy with a throat damper, but the top-sealing damper comes through strong with its efficiency, not to mention how protective it is when not in use.
Ultimately, I found that the top-sealing damper offers the best combination of efficiency, protection, and long-term savings for my CB-1008 Cubic Mini Wood Stove. However, folks who live in milder climates or only want immediate draft control might find throat damper a better option overall.
Pre-Installation Preparation
Before any chimney damper installation, you’ll need a few things:
- Ladder: To reach the top of the chimney.
- Screwdrivers: These secure the damper and any associated mechanisms.
- Wrenches: For tightening bolts or nuts.
- Drill with masonry bit: This tool secures the damper by drilling into the chimney crown or flue liner.
- Sealant: High-temp, waterproof sealant for an airtight seal around the damper, especially important for top-sealing dampers.
- Measuring tape: Measure the correct size of the damper needed for your chimney or flue opening.
- Damper kit: Your damper should have specific installation hardware (cables, chains, brackets).
- Flashlight: To illuminate dark areas within the chimney or firebox during installation.
- Protective gloves and goggles: Protect your hands and eyes from sharp edges, debris, and dust.
- Wire brush: Used to clean the chimney area where the damper will be installed.
Chimney damper installation can be dangerous if not done safely. Ensure you are comfortable working at heights and familiarize yourself with chimneys before beginning. Here are some general safety guidelines:
- Work with a partner: One person on our ladder can steady it while another goes up or down if necessary. A partner can also pass tools when working at heights or with heavy materials.
- Use proper fall protection: Use a safety harness securely anchored on roofs.
- Wear appropriate clothing: Non-flammable clothing is best; sturdy boots protect from scrapes and burns.
- Check the weather: Don’t install in windy, rainy, or snowy weather, as you could risk falls or other accidents.
- Turn off the stove: Ensure the wood stove is completely extinguished and cool before installing a damper.
- Ventilate the area: Ensure the room is well-ventilated to avoid inhaling dust or fumes from the sealant.
- Be mindful of electrical wires: Check for hidden wires before drilling into the chimney or walls.
- Follow manufacturer’s instructions: Each damper and chimney system can be unique, so adhere closely to all guidelines provided with your damper kit.
Chimney Damper Installation Process
There are some differences between installing a throat damper and a top-sealing damper. Here are some general steps:
Throat Damper Installation
- Prepare work area: Ensure the fireplace is cool and remove any ash or debris. Use a flashlight to inspect the chimney throat for any obstructions or damage.
- Measuring for damper: Measure the interior width and depth of the chimney at the point where the damper will be installed. The damper must fit snugly.
- Choose the right damper: Select a throat damper that fits the dimensions of your chimney. If you are unsure, consult with a professional or the damper manufacturer.
- Installing damper: Follow the manufacturer’s instructions for installation which usually involves fitting it in the chimney throat and securing it with screws or bolts to chimney walls. Some dampers may require mortar for installation; if so, prepare mortar according to the manufacturer’s instructions and apply it around the edges of the damper to secure it in place.
- Check the damper’s operation: After you install the vent, move the flap to the open and closed positions. Make sure it moves smoothly. It may need some fine-tuning to work properly.
Top-sealing damper Installation
- Access the chimney crown: Use a ladder or whatever you have to access it safely. Consider having someone spot you and wear a harness to be extra safe.
- Clean the chimney crown: Before doing this, ensure nothing is in your way. Debris, nests, or old damper remnants could cause problems.
- Measure and select damper: Grab something that can measure and measure the outer dimensions of the chimney opening so you can pick out the right size for your top-sealing damper. Figure out what shape you need from a chart or somebody who knows.
- Install the damper: Place the damper on top of your chimney and use the hardware provided to attach it to everything else. For most people, this means drilling into their chimney crown and using anchors or adhesive to hold the damper in place. Apply some high-temperature sealant around the base. This will prevent leaks when things heat up.
- Attach cable or chain: Top-sealing dampers use cables or chains, so make sure they’re down by your fireplace now before trying anything else.
- Test the damper: Pull on the cable or chain to test the damper. See if pulling on them opens it and vice versa! Adjust tension accordingly.
- Conduct final inspection: Check again at chimney damper installation site once more to certify everything is sealed and ensure nothing is wrong with the damper.
Maintenance After Chimney Damper Installation

Maintenance is a big deal after chimney damper installation. Here are some maintenance tips that I’ve found to be effective:
- At least once a year, thoroughly check your damper. Look for signs of wear, rust, or damage. This is best done at the end of the heating season.
- Regularly test the damper’s movement. Open and close it to ensure easy movement. If it becomes stiff or difficult to operate, an issue may exist.
- Throat and top-sealing dampers accumulate soot and creosote over time. Use a chimney brush to clean up within the confines of the damper and the surrounding regions.
- For top-sealing dampers specifically, ensure nothing obstructs their function from above. Remove any debris – leaves, nests, etc.–from the top of your chimney.
- Apply a high-temperature lubricant annually to help prevent rust and ensure smooth operation for hinges and moving parts.
- Over time, cracks can form in seals, compromising efficiency and inviting moisture into your chimney system. Check these regularly for possible replacement needs.
- Treat rust immediately: Don’t let rust sit on any part of your damper. Remove with a wire brush, then apply rust-inhibiting paint as needed.
- Let a professional do some checks. A professional sweeper will inspect and clean your chimney/damper system annually, as you should do yourself!
Troubleshooting Common Chimney Damper Issues
These are a few common problems and their solutions that I’ve encountered over my time with dampers.
Sticking or hard to operate
- Cause: The buildup of soot, creosote, rust, or debris can make the damper difficult to open and close.
- Fix: Clean the damper and surrounding area well. Use a wire brush for rust and a chimney sweep brush for soot and creosote. Lubricate moving parts with a high-temperature lubricant.
The damper won’t fully close or open
- Cause: Heat warping, mechanical failure, or obstruction.
- Fix: First, check for obstructions and remove them. If it is warped or has mechanical issues, it might need adjustment. Sometimes, loosening the damper hardware helps move it more freely.
Air leakage
- Cause: Worn out seal on top sealing dampers, or cracks around throat dampers.
- Fix: Replace worn-out seals on top-sealing dampers. For throat dampers, use high-temperature sealant to fill in the gaps/cracks around the damper.
Rust and corrosion
- Cause: Over time, moisture exposure leads to rust/corrosion. Especially if you live in a rainy climate, if your chimney cap is missing or damaged, water may enter your chimney.
- Fix: Clean off rust with a wire brush, then apply anti-rust paint made for high temperatures. If you don’t have a chimney cap already, consider installing one to prevent future water entry.
The damper won’t seal properly
- Cause: Deformation, improper installation of components, or deterioration of components.
- Fix: Check the fit and install the damper. If it’s deformed or the components are deteriorated, you might have to replace parts or the entire damper. Make sure to use high-quality sealant where applicable.
Persistent cold drafts
- Cause: The damper is not sealed when closed, allowing cold air to enter.
- Fix: Ensure throat dampers close all the way. If not, adjust or replace them. For top-sealing dampers, check the seal; if it’s worn, replace it. Also, consider insulating your chimney or installing a balloon below the damper (not in use).
Operational noise
- Cause: Loose components, vibration from airflow, expansion/contraction of metal parts.
- Fix: Tighten any loose parts. Lubricate moving parts to reduce friction. If the noise persists due to airflow, adjust the damper’s opening a bit to reduce vibration.
Although many issues can be fixed by simple maintenance and repairs, some cases require professional help. Consult with one if you encounter complex mechanical failures, significant warping/deformation, or are unsure how safe your damper is. A certified chimney sweep will also help prevent these problems from becoming serious through annual inspections—they ensure your chimney system remains safe and efficient!
Seasonal Considerations
You need to adjust your chimney damper from the heating season to the off-season. Doing so ensures safety and energy efficiency in your home. To help you out, here are some things to keep in mind.
Preparing Your Damper for the Heating Season:
- Before winter, check your damper for wear or obstruction. If soot or debris is on it, clean it off.
- Check for proper operation by opening and closing the damper multiple times. If it gets stuck, then you may need a repair.
- Apply high-temperature lubricant to these parts to prevent them from sticking when used frequently.
- Ensure that the seal is properly intact. A damaged one will increase energy costs.
- Hire a professional chimney sweep to inspect and clean your system.
Proper Damper Positioning During Off-Seasons:
- Leave the damper open just a bit when it’s not being used. This allows air to circulate so that moisture doesn’t build up inside.
- With chimney damper installation, you should already have a chimney cap installed. The cap stops rain, animals, and other debris from entering but still allows air circulation, which is important during the off-season.
- In areas with high humidity, use moisture absorbers around your fireplace and leave the damper open slightly for ventilation.
- Look at your damper often, even during the off-season. Observe whether birds have built nests inside or if there are signs of liquid leakage nearby.
- Some dampers come with locks or stops, allowing them to be fixed in a slightly open position. That way, they can still ventilate while not being able to be fully opened accidentally.
Conclusion
It doesn’t matter which chimney damper installation you go with. You must maintain them all the same. Ensuring a properly functioning damper will do more than just save energy. It will also prevent chimney fires and carbon monoxide buildup.
Considering the seasons is also a must. You want to prepare your damper for the heating season and ensure it’s properly positioned during the off-season. This will help prevent moisture buildup, damaging your chimney system and hindering ventilation.
I advise any wood stove or fireplace user to be proactive when taking care of their damper. Regular inspections can help catch potential issues before they become significant—and expensive—problems. Investing in the maintenance of your chimney damper isn’t just an investment in a warm home; it’s an investment in a safe one, too.
Additional Resources
Here are some helpful links that you can use for more information on chimney damper installation and maintenance:


Comments